hmsAutomate your releases to AppGallery with Github Actions (Part 2)
Automatically upload the APK to the AppGallery using the Publishing API
Our goal is to be able to automatically upload our new auto-generated signed APK to AppGallery with Github Actions.
In the first part of this guide we managed to start the process taking into account security for sensitive information and we obtained a correctly signed APK ready to publish it to AppGallery. You can see the first part here:
Automate your releases to AppGallery with Github Actions (Part 1)
To achieve our goal we will use the Publising API which is part of the AppGallery Connect APIs.
Publishing API
This API allows us, among other things, to create a new application record in AppGallery, update the application information, upload files, which can be APK, RPK (for QuickApps) or AAB, but also icons and other files for the application.
As you can imagine, we will use the service of uploading a file, in this case a signed APK from part 1, but to make this file appear in AppGallery and ready to select it and launch a new release we will have to do some necessary steps before.
These are the steps to achieve it:
- Get a token to perform all this process.
- Get a valid URL to upload the signed APK.
- Upload the APK with the URL obtained in the previous step.
- Update the application information to announce that there is a new package uploaded in the previous step.
Each of these steps is a Publishing API endpoint.
Preparations
To start consuming these endpoints we first need some important data that we will use.
For step 1 we need the Client Id and the Client Secret for that we need to create a new API key in the AppGallery console. Sign in to AppGallery Connect and select Users and permissions then Api Key > Connect API.
Create an API Key, which can be used for all or selected applications.
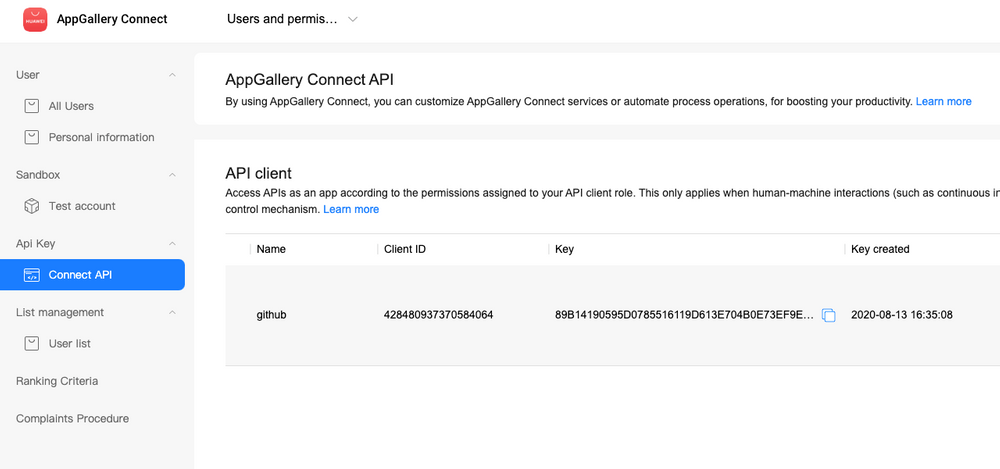
After creating it you will be able to identify our Client Id and the Key that would become our Client Secret. This information is sensitive.
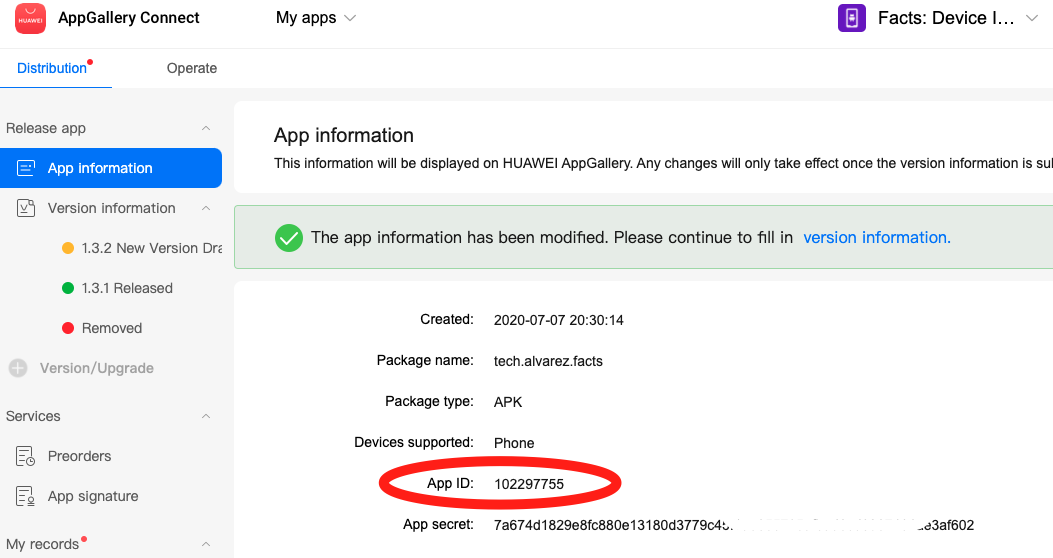
Another piece of information we need is the App Id of the application to which we will upload a new signed APK. This information is easy to find on the main page of our application in the console. We could say that this data is not sensible since it is public.
We are now ready to start consuming the API.
The Script
We could make calls to the endpoints by command line with curl. But to make it easier for us to parse the responses we will create a python script. We take advantage of the fact that all this runs on Ubuntu that already has Python and PIP installed. This in python is straightforward.
Step 1: Get a token to perform all this process
We will use "requests" for requests and each step will be a function. We will create the function in the simplest way (it could have validations and more) to focus on the main thing.
import requests
import sys

def get_token(client_id, client_secret):
    url = 'https://connect-api.cloud.huawei.com/api/oauth2/v1/token'
    body = {
        'grant_type': 'client_credentials',
        'client_id': client_id,
        'client_secret': client_secret
    }
    response = requests.post(url, json=body)
    if response.status_code == 200:
        json = response.json()
        return json['access_token']
    else:
        print('token: ' + str(response.status_code) + ': ' + response.reason)
This will return the token that we will use for the whole process and for the next step.
Step 2: Get a valid URL to upload the signed APK
Here the App Id enters the game and between the parameters we define what type of file we will upload, in this case APK.
def get_upload_url(access_token, client_id, app_id):
    url = 'https://connect-api.cloud.huawei.com/api/publish/v2/upload-url'
    params = {
        'appId': app_id,
        'suffix': 'apk'
    }
    headers = {
        'client_id': client_id,
        'Authorization': 'Bearer ' + access_token
    }
    response = requests.get(url, params=params, headers=headers)
    if response.status_code == 200:
        json = response.json()
        return json['uploadUrl'], json['authCode']
    else:
        print('upload-url: ' + str(response.status_code) + ': ' + response.reason)
This function returns the URL that we use to upload the file in the next step and the authentication code necessary for this action.
Step 3: Upload the APK with the URL obtained in the previous step
This function is what performs the process of uploading the APK, for this it needs the file path. The maximum size for an APK is 4GB, in case it is larger it can be uploaded in parts using another endpoint, you can see: Uploading a File by Chunk
def upload_file(upload_url, auth_code, path_file, access_token, client_id, app_id):
    headers = {
        "accept": "application/json"
    }
    body = {
        'authCode': auth_code,
        'fileCount': '1'
    }
    with open(path_file, 'rb') as f:
        response = requests.post(upload_url, files={'file_name': f}, data=body, headers=headers)
        if response.status_code == 200:
            json = response.json()
            fileInfoList = json['result']['UploadFileRsp']['fileInfoList'][0]
            update_app_file_info(file_url=fileInfoList['fileDestUlr'],
                                 file_size=fileInfoList['size'],
                                 client_id=client_id,
                                 access_token=access_token,
                                 app_id=app_id)
        else:
            print('upload-file: ' + str(response.status_code) + ': ' + response.reason)
Step 4: Update the application information to announce that there is a new package uploaded in the previous step
We carry out this last step within the previous function so that it is called as soon as the file is finished uploading. It is not enough to upload the file, we must tell AppGallery that we have a new package for our app.
def update_app_file_info(file_url, file_size, client_id, access_token, app_id):
    url = 'https://connect-api.cloud.huawei.com/api/publish/v2/app-file-info'
    headers = {
        'client_id': client_id,
        'Authorization': 'Bearer ' + access_token
    }
    body = {
        'fileType': 5,
        'files': [{
            'fileName': 'this_is_a_new.apk',
            'fileDestUrl': file_url,
            'size': file_size
        }]
    }
    params = {
        'appId': app_id
    }
    response = requests.put(url, headers=headers, json=body, params=params)
    if response.status_code == 200:
        json = response.json()
        pkgVersion = json['pkgVersion'][0]
        msg = json['ret']['msg']
        code = json['ret']['code']
        print str(pkgVersion) + ', ' + msg + ', ' + str(code)
    else:
        print('app-file-info: ' + str(response.status_code) + ': ' + response.reason)
Note that as a parameter is the name of the file with which it will be registered, in this case it is a constant that could be a more interesting variable (with the dynamic version, flavor, etc.)
Run the script
To execute the script we need to call the previously created functions but also send as a parameter all the information that it needs and that we prepare. For that we will use the Python sys package, it would look like this:
app_id = str(sys.argv[1])
client_id = str(sys.argv[2])
client_secret = str(sys.argv[3])
path_file = str(sys.argv[4])
print app_id, client_id, client_secret, path_file
access_token = get_token(client_id=client_id,
                         client_secret=client_secret)
upload_url, auth_code = get_upload_url(access_token=access_token,
                                       client_id=client_id,
                                       app_id=app_id)
upload_file(upload_url=upload_url,
            auth_code=auth_code,
            path_file=path_file,
            access_token=access_token,
            client_id=client_id,
            app_id=app_id)
We upload the script to our repository for Github Actions to use.
GitHub Actions
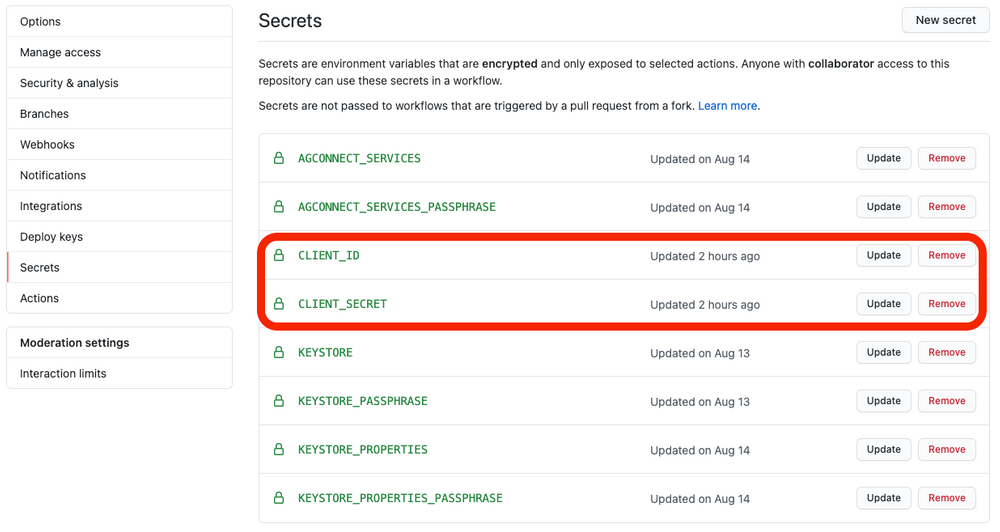
Well, now we just need to run our script in our CI/CD yml file. But some data that we prepare is sensitive data. What do we do with that sensitive data? Yes, the answer is "Secrets" from our GitHub repository.
Save Client Id and Client Secret data in Secrets that is in the Settings of the repository.
Now it only remains to call our script.
- name: Run Script
     run: |
        python --version
        pip --version
        pip install requests
        python my_script.py "102297755" ${{secrets.CLIENT_ID}} ${{secrets.CLIENT_SECRET}} app/build/outputs/apk/release/app-release.apk
Do not forget that the App Id can be a parameter, not necessarily a constant and it is not a private data, also to access the value of a secret, use ${{ }} and that after generating the signed APK it is located in the app path /build/outputs/apk/release/app-release.apk.
The Result
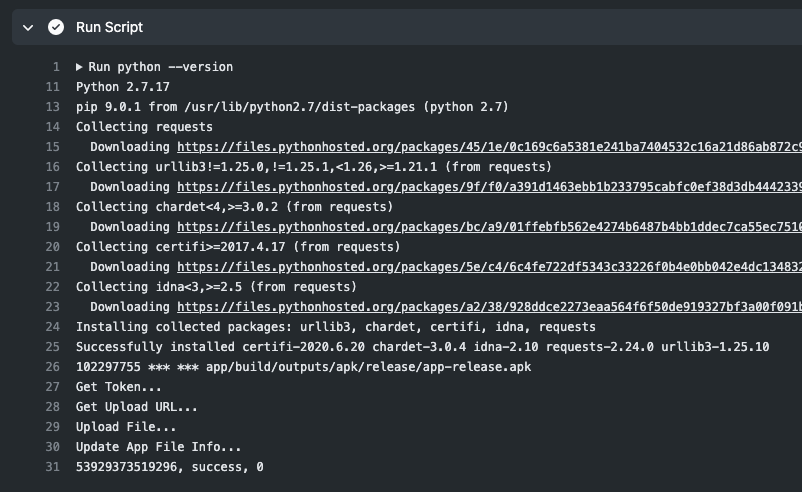
When a commit happens in our branch or when the CI/CD is started manually, you can see in the log the process of uploading the APK. Note that no matter how hard we print the GitHub Secrets, nothing is displayed per console, having only *** instead.
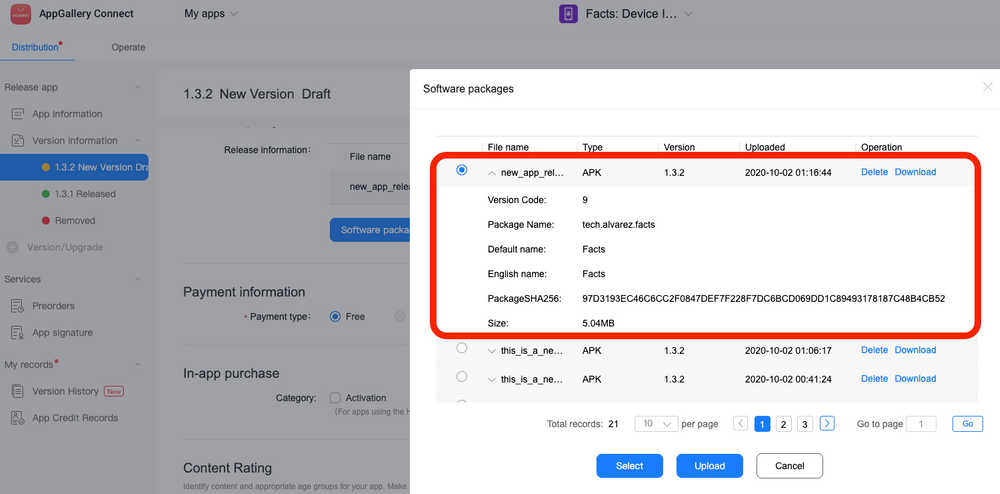
At the end you can check in the AppGallery console the package that was uploaded automatically, a properly signed APK ready for release. If it is a new version, a new section will be generated in Version Information.
Conclusion
With all this process and using Publishing API we achieved the goal, we managed to automate a whole process that is very tedious to do manually.
What's next
The next thing to finish the process, automatically push the release, maybe automatically upload new screenshots of the application, automatically update the app description, increment the version, maybe send it automatically to a group of testers, etc. There are many things that can be done and there are many Connect APIs that can be used.
You can see the yml file here:
And you can see the script here:
Implemented in a real project can be seen in: